Table from a large saw cut tree. A table made from sawn wood - instructions for making, care and use in design (110 photos)
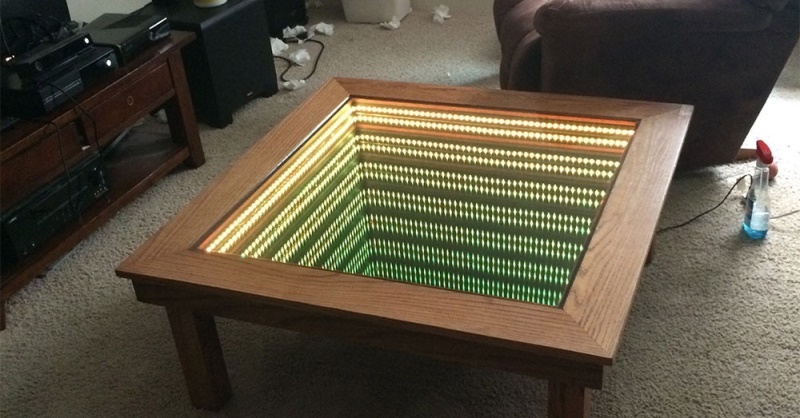
Many have seen tables with tabletops made of sawn wood, but few know that such an unusual option can be made on your own. We will consider how the work is carried out, what components are used and what nuances should be taken into account in order to get the best result in the end. Of course, the process will require a certain amount of time, but in the end you will get a unique product that you are unlikely to find from anyone else.

In the photo: a saw cut wood tabletop looks very unusual
To carry out the work, you need to stock up on everything you need:
No need to buy a grinder specifically for making a table, the easiest and most reasonable thing is to rent it for 1-2 days, such services are provided in most cities, just find the nearest company.

With this type of power tool, you can make a table with a perfectly flat surface.
The technology of countertops made of wood cuts is significantly different from the usual options, so we will consider it in great detail, it is important to properly prepare and clearly follow all the recommendations, this is the only way to guarantee a positive result.
Within the framework of this stage, the following list of activities is carried out:
- Cutting the material into thin saw cuts, it is very important to do everything as accurately and accurately as possible, the smaller the thickness of the fragments, the better they will be saturated with a protective compound and the less epoxy you will use. Best of all, if the saw cuts are about 1 centimeter thick, if you do not have cutting equipment, or you do not know how to work so accurately, invite a specialist with a chainsaw - he will quickly do everything necessary.

Small elements can be cut with a hacksaw, large ones require a special tool
All blanks must be dry, you should not use wet wood, so if your material does not meet the requirements, then it is better to postpone work and dry the end cuts.
- Next, you need to prepare the base, it must be even and durable. We do not recommend using chipboard, since this option can deform or simply fall apart with changes in humidity. It is better to use natural wood or thick moisture-resistant plywood, you can order cutting to the desired size when buying so that you have a perfectly even workpiece.

Due to the multilayer structure, plywood reacts much less to moisture changes than wood, so this option is the most preferable.
Now let's look at how a do-it-yourself tabletop is made from wood cuts, the process is quite laborious, but almost anyone can do it:
- The saw cuts can be processed - sanded for perfect smoothness and the bark removed, although some prefer to leave it. All elements are laid out on the tabletop so that you can arrange them as best as possible, at the same time it is checked if there are any dirt on the surface that will worsen the appearance of the table.
- If all is well, you can start gluing the elements, for this, carpentry glue is used, with which each cut is smeared and pressed against the base. After that, it is necessary to leave the product to dry the composition, the package indicates the period for which the adhesive gains strength.

Wood glue suitable for all types of wood
- Next, you should make the sides around the edge, for rectangular options, any plywood or wooden slats will do, for semicircular ones, you will have to find another solution - some kind of flexible sheets. Fastening is done in any convenient way, it can be nails, screws, and so on.
- Next, you need to prepare the epoxy resin, it consists of two components that are mixed immediately before use, all the nuances of use will be prompted by the instructions on the package. To give a certain color, the addition of fillers is required, which can be very different, for example, for a coffee color, 10% carbon black and about the same amount of bronze powder should be added to the composition (it may be less).

It is necessary to carefully understand the features of the epoxy composition used so that it does not freeze in the middle of work
Consider some options for tinting epoxy: for white, you need ordinary chalk, for gray - cement, for black - soot.
Ready-made dye options are also sold, so you need to check if there is one that suits you on sale.
- All voids are filled with the finished composition, it is important that the entire space is filled with the composition, after which the product is left to dry completely, this can take quite a long time.
- Now you can start grinding the surface, for starters, a coarser emery wheel is taken, and the plane is brought to the ideal with the smallest option. As a result, you should get a countertop with clearly defined saw cuts and filled space around them.

Another option is to install a frame around the perimeter, after processing you will get an original table for the kitchen
If you wish, you can make a table from wood cuts of various sizes, you can even make small options, it all depends on your wishes. The video in this article will tell you some important facts on the topic we have discussed.
Having conceived a plywood coffee table, work should begin with a drawing, using existing sketches or creating your own. In the latter case, we will get a 100% original product at the output.
Plywood coffee table - a more affordable alternative to natural wood
How to make a small round plywood table on rectangular bases:
- prepare a drawing including 4 parts - 2 identical round shapes for the base and countertop, 2 identical rectangular shapes for the table supports;
- transfer the detail patterns onto a plywood sheet with a nominal thickness of 9 to 30 mm (the thicker the sheet, the stronger the final product will be);
- cut out the required elements with an electric jigsaw or hacksaw;
- grind the ends of each template with a grinder;
- in rectangular shapes in the center, using a router, make cuts 1.5-2 cm wide so that you can cross-insert the parts into each other;
- connect the rectangular parts, after having smeared the joints with wood glue;
- fix the tabletop and the base of the table on a wooden cross with liquid nails (to increase the strength of the product, additionally fix the round parts with self-tapping screws or tongues);
- process the finished product with stain, paint (optional) and open with varnish.
The simplicity of the design makes it easy to screw the wheels to the table. Interior design in which plywood furniture will look great is grunge, minimalism, constructivism.
The idea of a square shape
A coffee table made of drawers is another unexpected idea of designers, captivating with its simplicity. Rectangular storage containers of various sizes are a universal basis for creating furniture with your own hands. Unusual tables, chests of drawers, cabinets and chairs can be assembled from simple plastic boxes, but a more elegant and vintage look of homemade furniture is easier to achieve using vintage wooden boxes.
What you need to make a table from boxes on wheels:
- 4 wooden boxes, the same size;
- a sheet of plywood with a thickness of at least 10 mm;
- 4 swivel casters for containers, trolleys and scaffolding;
- puncher or screwdriver;
- wood glue;
- self-tapping screws;
- fasteners (dowels);
- impregnation for wood;
- water-based varnish;
- brush.

A coffee table made of drawers is another unexpected idea of designers, captivating with its simplicity.
How to make a table:
- clean the boxes with sandpaper, apply impregnation and open with varnish;
- let the product dry;
- put the boxes on their side and put them together in such a way that a table is formed (at the same time, peculiar shelves are formed on the side of the structure);
- mark the mounting points and drill holes for fasteners;
- connect boxes;
- using self-tapping screws, fix the wheels at the corners of the plywood sheet;
- fix the fastened boxes on the plywood base.
In the resulting recess in the center of the product, you can pour a variety of decor, put a vase of flowers, a lamp, put magazines or books in the side shelves, turning the coffee table into an original bookcase. This type of furniture will fit well into the design of a home furnished in eclectic, country or French Provence style.
Automotive element in the house
A completely unusual piece of furniture can be made using an old car tire. This technique is used by the most fashionable designers, and perhaps it is this idea that will form the basis for creating an exclusive coffee table with your own hands.
For the coffee table you will need:
- old tire;
- plywood;
- rounded wooden beam for the manufacture of legs;
- studs and nuts;
- liquid Nails;
- glue gun;
- drill and screws;
- natural tourniquet for decoration;
- finish coating.
How to make:
- choose the most surviving wheel, wash and dry;
- cut a wooden beam into three equal parts and make table legs (if you have your own lathe, it is advisable to make cone-shaped supports);
- give the tire stability with the help of studs, nuts and hard plywood inserts in three places;
- put a wooden tabletop on liquid nails and fix it on the tire with self-tapping screws;
- attach the legs to the base and screw to the tire (it is desirable that the screws through the rubber enter the plywood stiffeners);
- using a glue gun, fix the natural twine in the middle of the countertop;
- braid the countertop in a circle from the center to the edges, constantly gluing the rope;
- continue decorating until the twine covers the entire rubber surface of the tire;
- fix the end of the braid with glue and a metal bracket;
- cover the table with a top coat (wax or varnish).
A tire table does not have to be decorated. By installing special wooden limiters at the bottom of the tabletop, it can be made removable like a lid, which will allow you to store various useful little things inside the tire.
A table made from a car tire and decorated with a towed rope can become a highlight of the interior, and a brutal rubber table will perfectly fit into high-tech and techno style.
Exhibit of the travel club
Retro style lovers and avid travelers who want to express their passion in an interior setting can easily make a table with their own hands from an old grandfather's suitcase.
What you need:
- suitcase with rigid walls;
- wooden furniture legs or wheels;
- a sheet of thick plywood;
- screws and screwdriver.
Even a strong suitcase is better to be further strengthened with plywood sheets. This will allow you to get a flat "tabletop" without dips, on which you can put both plates for food and glasses. Product manufacturing steps:
- cut 2 templates from plywood and attach them from the inside to the walls of the future suitcase table;
- make markings for the legs and screw them to the bottom plywood template inside the suitcase with screws;
- paste over the inner surface of the resulting table with a baize, linen or felt.
Original tables from suitcases can be decorated to your taste in a variety of ways. They are decorated with travel stickers, envelopes, stamps. The decor made using the decoupage technique with the effect of aging looks very profitable and elegant. The interior design, in which the table-suitcase will look organically, is avant-garde, eclectic, loft and fusion.
Europallet product
Few people know that it is possible to create an exceptional home interior using ordinary wooden production pallets (Euro pallets). The process of making a coffee table from one or more pallets will not require much effort, since the product itself has an extremely successful shape.
Required materials and tools:
- wooden pallet;
- swivel wheels;
- brush;
- sanding machine;
- wood glue;
- drill and screws.
Assembly order:
- clean the pallet from dirt with a stiff brush;
- sand the boards;
- coat the structure with a primer for wood products;
- fix the swivel wheels at the corners of the base of the product with a drill and screws.
Having redone the pallet, you should give it a designer look with the help of finishing. White or bright acrylic paint, water-based varnish will help with this. The table from the pallet can be painted all over or an original drawing can be applied to its working surface.
If desired, the pallet can be ennobled by placing on top of impact-resistant glass of the same size as the pallet or treated plywood. A pallet table can be static and just stand on the floor, or it can be able to go to a place convenient for the owners of the room if spinning wheels are attached to its base. In addition, rubberized wheels do not scratch the floor.
New life for old things
Changing the windows in the apartment for fashionable metal-plastic, many throw away the old frames, not even suspecting that an amazing home-made coffee table can be made from them.
All you need to do is:
- remove metal fittings from the frame;
- clean up paint residue;
- strengthen the corners of the structure with additional fasteners;
- lay a frame with glass on unusual legs (piles of books or packs of old magazines can serve as supports for such an impromptu table).
In the case of using a double frame, it is permissible to have the most diverse decor between the glasses:
- beads;
- colored sand;
- sea shells;
- dried flowers.
Changing the windows in the apartment for fashionable metal-plastic, many throw away the old frames, not even suspecting that an amazing home-made coffee table can be made from them.
Not a single guest will remain indifferent when he sees such a creation of the master. Interior design, which involves the presence of hand-made furniture from old things, is eclectic, kitsch or pop art.
As a basis for the table, you can use:
- cast iron battery;
- skeleton of an automobile engine;
- barrel, grandmother's chest, large stones;
- rolls of old wallpaper.
Unusual legs will turn out from water pipes, and from plastic, door leaf or an old mirror - an original countertop.
Using fragile glass as a work surface, single-leg structures should be avoided; those who have small children and large pets in the family should be careful with glass.
Using improvised materials, showing imagination, you can make an original and multifunctional transforming table, an exclusive bedside table and a comfortable sofa table-shelf.
Anyone who has ever tried to remake banal things into unique "living" interior items is unlikely to be able to stop. Independent design and manufacture of furniture is a fascinating, addictive process that for many becomes a real hobby. Homemade coffee table is the perfect item for the first experience. Out-of-the-box thinking, original design approach and a bit of craftsmanship - all that is needed for success.
Have you ever experienced joint pain? And you know firsthand what it is:
- inability to move comfortably and easily;
- pain during or after exercise;
- discomfort when going up and down stairs;
- inflammation in the joints, swelling;
- unpleasant crunch, clicking not of their own free will;
- causeless and unbearable aching pain in the joints ...
Please answer the question: are you satisfied with this? Can such pain be endured? How much money have you already “leaked” for ineffective treatment? Time to end this! Do you agree? Today we are publishing an exclusive interview with Professor Dikul, in which the doctor revealed the secrets of getting rid of joint pain, treating arthritis and arthrosis.
Attention, only TODAY!
We are VKontakte
Do it yourself for a summer residence
Equipment and inventory
Ideas for giving by mail
By clicking on the button you consent to the processing of your personal data
Country recipes
Horseradish for the winter - homemade recipes
It is no secret that the uncontrolled growth of horseradish on the site is the scourge of any gardener, but do not despair! Today's selection of horseradish preservation recipes will surely appeal to spicy lovers and you will be happy to […]
How to pickle hot and bell peppers for the winter
There is an opinion that home canning is a rather laborious process that requires special equipment, time and patience. This is common with many foods, but not with pickled peppers. This article offers 2 pickling recipes […]
Peppers in gelatin for the winter, recipes with photos
Peppers in gelatin, prepared for the winter, will be an amazing and original snack not only on the menu for guests, but also for a morning breakfast or lunch. Moreover, the recipes involve the preparation of jelly on […]
Marinated eggplant with garlic and mint for the winter
Pickled eggplant is one of the vegetables that immediately comes to mind when it's time to prepare preparations for the winter. Today's eggplant recipe with garlic will also be original in that the composition of the marinade […]
Soaked apples recipe at home
Urination, like salting and pickling, primarily has important functions of preserving the crop for the winter. Therefore, pickled apples at home are practically a brand. Nothing like this […]
Pickled radish for the winter, have you tried this?
Radish is a very unpretentious and very healthy vegetable that can be grown almost all summer. Due to the fact that the radish crop ripens quickly, it can be grown every 3 weeks, and with a weekly […]
It is human nature to surround oneself with things that keep warmth and comfort. These qualities are maximally embodied in things made by one's own hands. Individual crafts retain a piece of the soul invested in them. Personal products become unique, stylish, exclusive. They certainly will not be replicated and commonplace.
The main thing is to overcome the initial doubts about your own abilities, strain your imagination, and get to work. Then you can be sure that the hand-made production of household items and design is not such a difficult undertaking. This position is confirmed by examples of do-it-yourself tables made from improvised materials. Attractive and original furniture from an unnecessary suitcase, an old window frame, pallets, and other things will decorate the interior of the room.
Vintage style suitcase table
An old suitcase, which has absorbed the aroma of travel, can unexpectedly decorate the interior of a living room, office, bedroom. From this item you can make written, coffee, coffee tables. They will become rare keepers of the hearth. Tables-suitcases combine 2 opposite qualities: settled way of life and passion for travel.
What you need
To successfully implement this idea, you will need:
- unnecessary suitcase;
- furniture legs (can be wheeled for a mobile table);
- plywood or chipboard;
- wooden bars;
- screws (self-tapping screws);
- sandpaper;
- paint can;
- felt seals;
- roulette;
- screwdriver
Here is such a simple and simple set that will help you make a table with your own hands.
How to make
When improvised materials and tools are ready, they begin to work.
- To strengthen the base, plywood or chipboard is laid on the bottom of the suitcase.
- Plywood (chipboard) is fixed with wooden bars. 2 strips are screwed with screws to the side walls of the suitcase.
- Metal parts are covered with masking tape.
- Painting is carried out using a spray can.
- Legs are being prepared: sanded with sandpaper, painted.
- A felt seal is attached to each leg at the bottom so as not to scratch the floor.
- The mounting tape is removed.
- The legs are screwed on.
- The front parts of the suitcase are decorated.
- The table is mounted on legs.
Decorating it with stickers will give great originality to the appearance of suitcase tables. Their role can be played by stamps, magnets, souvenir images. The range of applied jewelry is the widest.
It is not necessary to attach legs to a massive suitcase. It is enough to restore its appearance (paint or cover with a colorless varnish). This table-suitcase looks really impressive.
Having picked up graceful legs, painting an old suitcase in a delicate color, you can make a comfortable coffee table. Otherwise, the technology for turning a suitcase into a piece of furniture remains the same.
Having shown remarkable imagination, using ingenuity, the suitcase is turned into a desk like a secretary or bureau. Shelves are fixed in it, small boxes are mounted, a retractable (folding) board is fitted. By attaching folding legs, this design is turned into a portable item.
There are many options for the wonderful transformation of a suitcase into a table. A self-made suitcase table fits well into the interior of various styles: from retro or classic to hi-tech. Out of the box thinking people are able to turn old suitcases into a unique piece of furniture and decor.
Old window frame at the base of the table
From the old window frame it is possible to make a table that meets the "romantic" style. Modifications are very different. Therefore, everyone has the right to make their own zest. But in the manufacturing technology itself there are such common points.
Walkthrough
- The old window frame is cleaned of dust and dirt. To do this, the glass is removed (it can be replaced with a new one with an increased thickness), a layer of old paint is removed. All metal parts on the surface of the frame are removed. It is smoothed out with sandpaper.
- The frame is covered with white paint. You can use acrylic, after drying which the wood is cleaned with sandpaper. The product will receive an archaic look. You can use two colors (dark and light tones). First, the frame is covered with a dark shade of paint, then after drying - light. The surface is treated with sandpaper until the first layer appears. A very intricate drawing is created.
- Legs 34 cm high are made from a cutting. They are smoothed out with sandpaper.
- 4 trimmings are selected (from wood or thick chipboard), equal in width to the frame. Their length is 8–10 cm. The edges are cleaned with sandpaper.
- In each of the trimmings, 4 through drillings are made in the corners. Two more holes are drilled along the center line at the same distance from the edges: one for fixing the legs, the second for a more secure attachment to the frame.
- Each of the trimmings is attached to the leg with a long self-tapping screw or confirmation (Euro-screw).
- Trimmings with legs are attached to the front of the frame. When the structure turns over and is installed on its legs, a “box” or a kind of niche, recess should be obtained. The frame with the front part (closed with glass) is directed to the floor, and the open niche is up.
- A coarse thin rope is wrapped around each leg. The ends of the rope are fixed with a glue gun.
- Glass is washed and degreased on both sides. Various accessories are laid out in a niche on the glass. It can be sea pebbles, shells, colored glass. You need to decompose them with an imitation of negligence, randomness. You can arrange these elements thicker in one corner with a gradual decrease in diagonal, leaving the opposite corner clean. Each element is fixed to the glass with a transparent two-component adhesive. In height, small objects should not protrude beyond the edges of the frame.
- With indents of 1.5–2 cm, glass 4 mm thick is cut to fit the frame. This is a countertop, which should close the frame box completely. It is better to cut glass in the workshop. In the same place, you can ask to grind the edges and drill holes in the corners (4 mm in diameter). Glass is rubbed on both sides. Then they cover the frame. To fix the glass, leather or rubber gaskets are cut out under the washers. Self-tapping screws are screwed in from above. They must be screwed in very carefully, without undue effort, so as not to damage the glass.
- Next, a coarse thick rope is taken. At one end, a loop is made equal to half the long sidewall of the frame. The rope folded in half is glued from the center to the edges. In the place of the loop (10–15 cm), glue is not used. The loop is left free to tie a knot. The long end of the rope circles the perimeter of the glass. Throughout the rope is fixed with glue. Having reached the loop, they thread the rope end into it, imitating a marine knot. The rope is pulled back, doubled, glued to the frame.
- The outer side of the frame is decorated (the corner where many decorative elements are concentrated). You can continue the composition by lowering the decorations along the leg of the table. It will give the impression that the details of the table flow out.
The created table with your own hands is ready. You can enjoy your own creation, surprise guests and share with them the joy of contemplating the original item. Such a table will enliven the interior, become its visual focus.
Features of the choice of wood
Someone focuses on the cost of lumber, another is important for the resistance of the tree to decay, for the third - its texture. What can you recommend to a novice furniture maker? Do not use for the table, unless it is intended to be installed somewhere in the back room or garage, the same type of wood. This is exactly what many novice "craftsmen" do, picking up the same type of boards and bars from what is left of the construction or repair and gathering dust in the barn.
When making a wooden table for living quarters, verandas, and so on, you need to take into account the properties of individual species. Naturally, if there is not enough experience in assembling furniture, you should pay attention to cheaper wood. The first table (chair, stool) in life is just a kind of training in manufacturing, gaining experience.
Tabletop. Here in the first place - strength and minimal absorption of moisture. It is on this part of the table that something is constantly spilled. The best choice is pine, larch, oak (although the latter is more expensive). Thickness - at least 3 cm.
If the dimensions of the countertop are small, then you can use wood-based slab products (OSV and the like). But only with lamination to prevent swelling of the material when liquid enters the surface of the table. For example, LDSP.
Legs. Birch. From moisture it can “lead”, but in terms of strength - an excellent option. The optimal parameters of the blanks for the legs (in cm) are: length - about 76, cross section - 5 x 5. Dowels. Acacia. It is much easier to find than boards from the often recommended boxwood.
In the furniture industry, low-grade lumber is not used. This is not economically feasible, since pre-treatment of wood increases the duration of the production cycle. But in the manufacture of something, wood of lower grades, substandard - just right. The same pallets left after using stacks of foam blocks or bricks.
And not just because it's free or relatively cheap. Many of the disadvantages of such wood with a competent approach can be turned into pluses. For example, after coating with a colorless varnish, the countertop acquires a unique original look.
The main thing is that the boards do not have obvious defects in the form of rot, cracks, falling knots and wormholes.
If pine is chosen for the countertop (this also applies to many other conifers), then you need to pay attention to the location of the annual rings. These arcs are called humpbacks. The cuts of the boards show how they are oriented, and this is taken into account in the process of laying them in a row. Samples obtained by the tangential sawing method are arranged in alternation (pink down, the next one up); radial cutting - the same way (with arcs in the same direction). The nuance is insignificant, but it is the observance of this recommendation that eliminates the risk of warping and splitting of the boards.
For furniture, if you think about its durability, you should take only dry lumber. During the drying of the wood, it will deform; this is a natural process, and its consequences in the form of twisting, warping, bending are inevitable. Such a table will quickly begin to warp, and you will have to deal with its repair. And here you need to decide whether to purchase high-dry wood or rid it of moisture yourself. The first option is simpler, but such a tree is more expensive. The second will cost less, but there are a number of purely technical difficulties.
- Firstly, it is necessary to ensure a stable temperature regime in the place where the blanks are stored. Changes in its value will lead to uneven evaporation of moisture, which will negatively affect the strength of the tree.
- Secondly, good ventilation must be organized.
- Thirdly, and, perhaps, this is the most unpleasant moment - you will have to wait, up to about six months, depending on the initial moisture content of the tree. But this is not a guarantee that the result will be expected; Even this takes practice.
This once again confirms the idea that when starting to make wooden furniture for the first time, one should focus on the simplest table for household needs from cheap lumber, without pretensions to its sophistication and originality of design. For example, for a barn, garage and the like.
Features of the assembly of wooden tables
If a person undertakes to make something, then he knows how to use the tool, read the drawings and work with lumber. Such a home master does not need to be taught the basics of carpentry. But a number of nuances in the manufacture of a wooden table will be useful to note. These notes will only help in the process of work.
Let's start with the types of connections. There are quite a few of them, but for a table that is assembled with your own hands, the following are quite enough.
On dowels
In this case, the parts are fastened by landing on the adhesive composition (Fig. 1 - 3).
The nuance is that for the manufacture of "cylinders" that are inserted into pre-drilled "channels", a tree of a denser structure is taken than the elements of the table. This is what ensures the strength of the connections. Before installing them, chamfers are removed from the edges of the dowels and holes.
These round sticks are commercially available, in any furniture store, in several sizes. To grind them, even with a carpentry machine, is a waste of time. It is not recommended to purchase plastic dowels for the table; they are used for collapsible connections. For example, frame furniture (walls, multi-level racks, etc.).
Nails should not be used to fix table elements (Fig. 4). Metal and wood differ in the degree of thermal expansion. Such a connection will not last long - a “shat” will begin, especially if the table is intended for installation on the territory or in an unheated room.
On the tsargs
It is advisable to make such connections if the table has to be either periodically disassembled, or without it it cannot be moved through the doorway. Although not all kings involve the dismantling of the structure. The most practiced options are shown in the figures.
Bolted
Such connections are mainly used for garden or outbuilding furniture; for utility tables. An example is shown in the figure.
The nuance of working with fasteners
In order for the self-tapping screw to be easily screwed in and “go” in the right direction, a hole is first made at the point of its installation with a drill, with a diameter slightly smaller than the leg of the fastener. The main thing is to maintain the coincidence of the center lines, that is, to prevent skew. In this case, for the "landing" of the self-tapping screw, you can do without a screwdriver.
Features of wood processing
Everyone knows that a planer is used first, an abrasive with a large grain, and then a fine one. But sometimes it turns out that the last stage, grinding, has to be done repeatedly. Here much depends on the type of wood and the degree of its drying. After applying the first layer of varnish, the villi may “stand up”. Nothing wrong with that. You should wait for the workpiece to dry and repeat its processing with an abrasive. The work is painstaking and takes time. But it is by this technique that you can bring the "problem" wood to the ideal "smoothness".
To eliminate the risk of injury to a person, all edges and corners of the table should be slightly rounded.
Features of the exterior
- Minor defects in the form of cracks, chips are eliminated with a putty composition.
- After sanding, all wood dust must be removed. In this case, an ordinary household vacuum cleaner with an appropriate nozzle will help out. After such cleaning, it is recommended to wipe the entire table with a slightly damp cloth, let it dry and repeat the cleaning of the remaining dust. After that, you can safely proceed to applying stain or varnish - there will be no “pellets” on the tree.
- You can give originality to the table not only with the help of curly cutouts, an unusual shape of the tabletop or legs, a combination of textures of different species, and so on. One of the good options is art painting.
And finally. Work on the independent manufacture of something from wood (the same table) is just the initial stage in mastering the skill of the “assembly designer”. Having worked out the technologies, techniques on wood, having acquired the necessary skills, it is enough just to switch to other materials - metal, plastic, glass. So the benefits of a wooden table, made according to even the simplest drawing (except for the pleasure of work and the money saved) are obvious - not wasted time.
- Material selection
- Furniture manufacturing
- Finishing Features
Many owners use purchased furniture when arranging their living space.
Oak furniture is very reliable, durable and beautiful.
However, it should be borne in mind that a table or chair made by hand will give warmth and comfort for a long time.
Such furniture can be made from improvised materials or restored existing attributes.
Tools for the job
The full list of tools depends on the table format, as well as on the material chosen for work. In most cases you will need:
- jigsaw or saw;
- or a screwdriver (and various drills for them);
- connecting elements (nails, screws and the like);
- wood sanding machine and sandpaper;
- means for measuring and marking (level, pencil, ruler or tape measure);
- protective equipment during work (gloves and goggles).
It is unacceptable to work "by eye" according to approximate calculations - the result will turn out to be far from the desired one. You will also need drawings with the dimensions of each element of the table.
How to assemble a folding table?
The legs are fastened with a bolt (not longer than 3.5 cm). The table is assembled according to the following scheme:
- fasten the legs and supporting elements;
- on the countertop, the attachment points of the support are marked (self-tapping screws are used for fastening);
- all structural elements are numbered to simplify the final assembly;
- final grinding of all surfaces is carried out;
- parts are covered with a protective compound;
- the table is going "clean".
Making a folding table with your own hands is ultimately no more difficult than assembling a basic model, although this will require accuracy in calculations and exact adherence to the drawings.
How to make a wooden table with your own hands video:
Not everyone can see something majestic in a block of marble or the same piece of wood. Even fewer people are able not only to see, but to bring it to life. Making a table from a saw cut of a tree is a difficult task, but quite real. It is enough to have the desire to achieve the goal.
The result will be a unique handmade table
The choice in favor of natural furniture is due to several reasons.
The only drawback of the choice is the difficulty of selecting the interior. Undoubtedly, the table will be a bright detail, but you must admit that it will look wild in a manor a la “baroque” or “hi-tech”.

The manufacturing process will require a certain amount of time, but in the end you will get a unique product that you are unlikely to find from someone else.
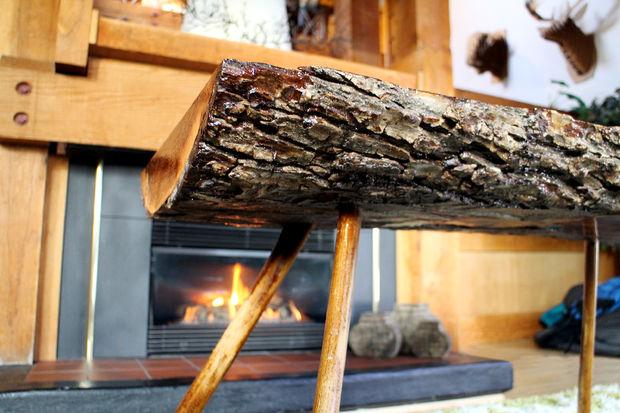
So the first thing you need is time. Such crafts require perseverance, thoroughness, and, consequently, time costs. But then they will look beautiful by the fireplace!
Decide on the look
and purpose of the table. Particular attention in the design should be given to the legs.
The choice of countertop is determined by its shape.

As you noticed, the choice of countertops is determined by the purpose and capabilities of the room.
Varieties of tables by the number of legs.

There are many modeling options. It all depends on your imagination and desires. These are entirely your ideas. How do you want to see the result?

Combine different shapes and types.
So, you have decided on the design. Fabulous! But now you need to prepare the materials - in fact, what the table will be made of. First of all, tree cuts will be required.

The size and number of cuts depends only on the project.
You will also need a piece of plywood for the base, epoxy resin with a hardener to fill the voids between the cuts, wood glue and an electric grinder.

Sander for wood surface treatment.
Ideal cuts: where to find?
The novice master thinks that to create such a product, it is enough to go out into the yard or into the forest, pick up a suitable log and cut “circles” for decoration. But not everything is so simple.

To prepare saw cuts on your own, you need to spend a lot of work and time.
But if you make a mistake, you will have to start all over again, since it is impossible to work with cracked discs. You can find a supplier on the Internet. The main advantage of ready-made saw cuts is that they have already been processed and after the purchase you can already begin to realize your dream.

You can buy saw cuts at a sawmill, which will be a budget option, and the choice of the most drawings is huge.
The only drawback is the processing problem. The peculiarity of handmade furniture is that it is unique and exists in a single copy. When choosing a saw cut, it is necessary to take into account the future pattern of the countertop itself.

To make it interesting, you need to pick up sections of different diameters and the required amount.
The saw pattern itself also matters. After all, it is he who is the highlight of the future product. Ideally, for greater convenience, draw a layout so that you do not improvise, but know exactly the expected result. Then you will avoid disappointment in the final result.

You can use one type of wood, or combine different options.
Choosing the right material:

Table making instructions
The design is chosen, tools and "consumables" are at hand - now it's time for a real man's work. More precisely, we go directly to the technical part.


Lacquer needs to be coated with 7 layers, pre-treat each layer with sandpaper to form a more reliable coating.
Implementing such a project is not easy. Moreover, this is hard, painstaking work, in the process, which requires patience, dedication and diligence from the master. But such an element of the interior will attract much more attention than a boring piece of furniture bought in a store.

Your work will be rewarded.
Do-it-yourself furniture is pride for the owner
You have created a beautiful piece of wood. But the main question is, where to put it? You can put it in the living room or dining room and just cover it with a tablecloth. But is it really necessary to hide such beauty, because it is in the countertop that the highlight is.
The unique structure of the tree will fill any room with natural beauty.
Interior styles in which the table will look appropriate.

The ideal solution would be a rustic or Scandinavian style, but you can show a little imagination and taste. Be the designers of your home. Let the style of your home be individual.

Guests will pay attention to a bright element of the interior, and when they find out that it is handmade, there will be no limit to delight.
Almost everyone is visited by creative thoughts, especially during repairs. One such idea is making a coffee table. When remodeling a living room, you want to make it original and unique, and furniture made on your own will help achieve this. To make your dream come true, you should figure out how to make a coffee table with your own hands and get an exclusive piece of furniture that compares favorably with store items.
Three ways to make an unusual table from natural wood:
- You need to find a block with a diameter of 40-50 cm, or just go to the sawmill and purchase it. For residents of private houses, this task can be easily solved, since the required diameter and texture can be selected from trees harvested for firewood. In order for this block of wood to turn into an interior item, you need to buy three furniture wheels and a colorless varnish. The horizontal wood coating must be sanded. Leave the bark or not, you decide for yourself, but with it the subject will be much more interesting. Next, you need to apply several layers of varnish on the block, let them dry completely and then attach the rollers. This completes the table, and you can roll it around the house without much effort.
- The construction of a coffee table according to the following method involves the use of wood trimmings. A strong branch will be used as a support, the design of which will make it possible to make a reliable tripod out of it. The role of the countertop will be played by a cut of a trunk with a thickness of 6 cm and a circumference of 50 cm. All material must be freed from the bark, carefully cleaned and sanded. Next, the tabletop is fixed on the legs with self-tapping screws. It remains only to apply a few varnish coatings to the manufactured table.
- For the manufacture of an interesting piece of furniture according to the third option, you will need to use cut-offs from a birch trunk. In addition, it is worth stocking up with plywood sheet, liquid nails, white grout and legs on wheels. From plywood, you need to cut out the base for the table and make a smaller box that is attached to the middle of the table top. Next, we fix the legs on wheels to the bottom.
After completing these steps, you can proceed to the decor of the resulting product: cut out several birch blocks and fix them to the plywood box with liquid nails, so that they are located vertically. In the installed position, the chumps should rise above the box by 50 mm. The free space on the surface of the table is filled with cuts fixed on liquid nails. The remaining gaps must be sealed with white grout, distributing it with a spatula. The solution that has crawled out is removed with a dampened sponge, and the product is left to dry completely, after which it is also varnished.
Methods for making tables from improvised materials
With two identical bookshelves and a plywood sheet, you can easily make an original piece of furniture. At the same time, the design of the shelves is not of fundamental importance: they can be either with or without glass doors. The first step is to prepare the base for the table by attaching the back walls of the bookshelves to each other with black metal plates that are attached to the bottom and top of the structure.
To facilitate the movement of the table around the room, two furniture wheels are fixed to its bottom. A sheet of plywood is required for the manufacture of a countertop, which is cut to the size of the shelves and screwed to their surface. It remains only to decorate the surface, choosing for this painting, staining or decoupage decor using three-layer napkins with a suitable pattern.
For the next idea, you will need legs from a computer chair that can rotate and a sheet of plywood or chipboard. It is required to make a countertop from a plywood sheet, choosing the shape and size of your choice. After that, the countertop is fixed on the leg with self-tapping screws, processed with a stain and covered with a varnish layer. As soon as the product is completely dry, it can be safely exploited.
A very beautiful thing can be obtained by combining birch and glass. To do this, you need to go to the forest and cut out a thick birch tripod (you can contact the sawmill) 70-80 cm high, or another size of your choice. The saw cut of the tripod is cleaned and polished, after which the entire object is varnished. As a tabletop, you will need to cut a glass circle of the required diameter, which is fixed on a tripod using special suction cups or decorative nails on the glass.
Thus, with a little imagination and a minimum of effort, you can fill your home with a unique thing that will delight you every day.
- How to choose the shape of the countertop?
- What is required for work?
- Stages of work
- Preparation
Dreaming of creating a cozy interior, many pay attention to tables made of wooden cuts. What options exist? Which model to choose?
Getting to the manufacture of a wooden table, you need to consider its design. And then start working.
Features of models of wooden tables: we determine the support
First, let's choose the shape of the support. The choice of material, finish, tools depends on the decision. Models are different.
Model on a single support. The round table looks good.
Models created on two legs must have a jumper. Then the table will be stable and easy to use.
The easiest way to create a traditional table on four legs. This design is the most reliable.
It is important to understand how to implement emerging ideas. And if the top of the table can be hidden with a tablecloth, then the legs turn out to be an important aesthetic component that can give out deviations from the standards.
How to choose the shape of the countertop?
Slab tables are made with tops of various shapes. What are the possible options?
The round model looks good in a spacious room created in a rustic or Scandinavian style. Only voluminous space will provide freedom of movement for people.
For the dining area, the oval model is best suited. A large-sized table is created, at which the whole family and guests can be accommodated.
Furniture that has small oval table tops is a coffee or coffee table. For the living room, it is better to choose high quality furniture, functional and elegant.
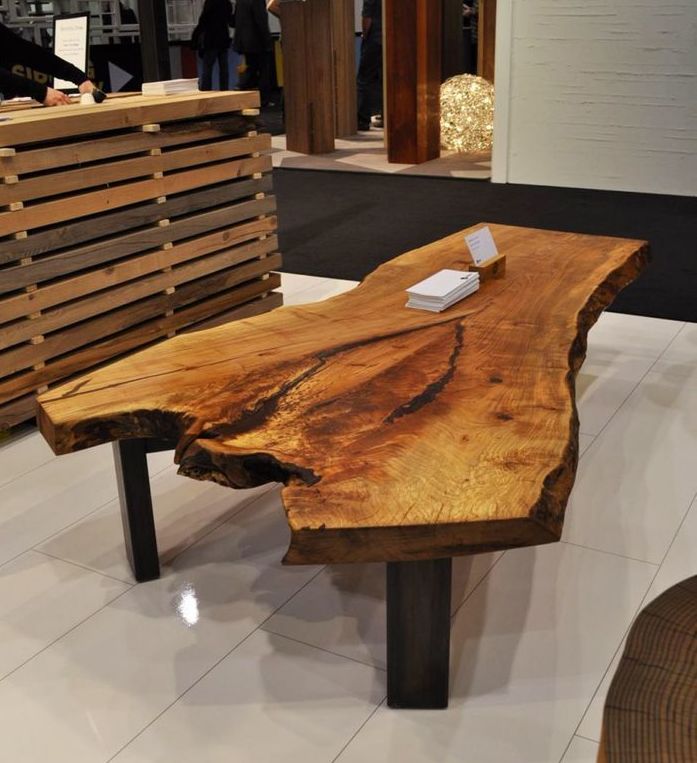
There is also a universal form of the table - with a rectangular wooden top made of solid wood. If you decide to choose a rectangular model, then you can successfully implement any design. You can create a small table of a folding or portable type.
A table from a saw cut can be made by anyone. There are no restrictions regarding the shape, height and size.
What is required for work?
Before creating a table made of natural wood, it is important to take care of the availability of all the necessary materials.

You can use an old countertop or a piece of plywood. Only a high-quality countertop made of end cuts will allow you to count on a long service life.
- End cuts. Configuration, the number of cuts depends only on your plan. There should be enough elements for a uniform, tight installation across the entire countertop. You can use different types of wood or material of the same species. If you want to create a beautiful table made of wood, it is best to combine.
- Joiner's glue is needed for attaching wood slices and countertops. The volume of glue is determined by the specifics of the work. You must be sure that each end of the structure is attached securely. From one package, 200–300 g of finished glue is obtained.
Epoxy resin with a hardener is a substance that will fill the space between the cuts. The amount of material used can be any. Made of quality material, the table will turn out to be beautiful and reliable. Cheap things don't last long.
Electric grinders are used to grind wood surfaces. Additionally, sandpaper with a grit of 120 or higher will be required.
Stages of work
The technology for manufacturing countertops from wooden saw cuts is specific.

Preparation
The first task is cutting the material into thin saw cuts. You must do everything accurately and accurately.. If you can cut fragments of the desired thickness, the impregnation with a protective agent will turn out to be of high quality. Yes, and epoxy can be saved. The thickness of the cuts should be 1 cm. If you do not have special equipment, contact a professional who can correctly cut the recommended thickness of the material with a chainsaw or circular saw. Dry blanks are used for cutting. If the end cuts are wet, the slab needs to be dried.
The next step is to prepare the foundation. It is best to refuse to use chipboard, since the material can deform or fall apart when the humidity level changes. Use slices of natural wood or thick plywood. Moisture resistance is important.
When buying a material, you can order it to be cut according to the calculated dimensions. Masters can correctly cut the material for the table of the required dimensions.

Description of the main part of the work
How to make a table using natural wood cut yourself?
The slab needs to be properly processed. Carry out sanding and bark removal. The material should become smooth along the end edge. The first stage is the blank for the countertop, then the layout of the sections and the manufacture of a quality product will not be a difficult task.
Now you can fix the elements with wood glue. Lubricate each cut, and then press it close to the base. Follow the recommendations of the adhesive manufacturer, set aside the structure until the adhesive is completely dry.
Now we need to make the sides around the edge of the table. For rectangular tables use plywood or wooden slats, for semicircular tables - flexible sheets. Fastening can be carried out in any convenient way, therefore the use of nails or self-tapping screws is allowed.
Then the epoxy resin is prepared. Use fillers to get the desired shade. To create a coffee color, 10% carbon black and bronze powder are used, for white color - classic chalk, for gray - cement, for black - soot. You can buy ready-made dyes.
Epoxy resin needs to fill all the voids, then wait for the product to dry completely.
Now it is allowed to grind the entire surface. To do this, you will have to remove the upper thinnest layer using an emery wheel. You must create a countertop that has a pronounced saw cut pattern.
The last step involves applying varnish. The best material is polyurethane. Durable and resistant to abrasion.
A table using a slab will last a long time. Creativity, ingenuity, a little experience with wood - and you can count on a good result.
Not everyone can see something majestic in a block of marble or the same piece of wood. Even fewer people are able not only to see, but to bring it to life. Making a table from a saw cut of a tree is a difficult task, but quite real. It is enough to have the desire to achieve the goal.
The result is a unique handmade table.
The choice in favor of natural furniture is due to several reasons.
- Furniture made of natural materials, calm natural shades favorably affects the mental state of the owner and his emotional background.

Such furniture improves the atmosphere in the house.
- Wood products are environmentally friendly. Given that modern furniture is made from toxic materials.

Environmental friendliness is a clear advantage.
- Savings on material and payment for the services of the master, if you do it yourself. A handmade product is very expensive, and not even because of the price of materials, but primarily because of the services of a designer, craftsman.

A saw cut wood table will become a reliable and original decor element of your home.
- Individual design. Each saw cut is unique and unrepeatable. And it keeps the history of life, which is imprinted in the drawing.

Many have seen tables with tabletops made of sawn wood, but few know that such an unusual option can be made on your own.
The only drawback of the choice is the difficulty of selecting the interior. Undoubtedly, the table will be a bright detail, but you must admit that it will look wild in a manor a la “baroque” or “hi-tech”.

The manufacturing process will require a certain amount of time, but in the end you will get a unique product that you are unlikely to find from someone else.
So the first thing you need is time. Such crafts require perseverance, thoroughness, and, consequently, time costs. But then they will look beautiful by the fireplace!

You should decide on the appearance and purpose of the table. Particular attention in the design should be given to the legs.
The choice of countertop is determined by its shape.

As you noticed, the choice of countertops is determined by the purpose and capabilities of the room.
Varieties of tables by the number of legs.

There are many modeling options. It all depends on your imagination and desires. These are entirely your ideas. How do you want to see the result?

Combine different shapes and types.
So, you have decided on the design. Fabulous! But now you need to prepare the materials - in fact, what the table will be made of. First of all, tree cuts will be required.

The size and number of cuts depends only on the project.
You will also need a piece of plywood for the base, epoxy resin with a hardener to fill the voids between the cuts, wood glue and an electric grinder.

Sander for wood surface treatment.
Ideal cuts: where to find?
The novice master thinks that to create such a product, it is enough to go out into the yard or into the forest, pick up a suitable log and cut “circles” for decoration. But not everything is so simple.

To prepare saw cuts on your own, you need to spend a lot of work and time.
But if you make a mistake, you will have to start all over again, since it is impossible to work with cracked discs. You can find a supplier on the Internet. The main advantage of ready-made saw cuts is that they have already been processed and after the purchase you can already begin to realize your dream.

You can buy saw cuts at a sawmill, which will be a budget option, and the choice of the most drawings is huge.
The only downside is the handling issue. The peculiarity of handmade furniture is that it is unique and exists in a single copy. When choosing a saw cut, it is necessary to take into account the future pattern of the countertop itself.

To make it interesting, you need to pick up sections of different diameters and the required amount.
The saw pattern itself also matters. After all, it is he who is the highlight of the future product. Ideally, for greater convenience, draw a layout so that you do not improvise, but know exactly the expected result. Then you will avoid disappointment in the final result.

You can use one type of wood, or combine different options.
Choosing the right material:

Table making instructions
The design is chosen, tools and "consumables" are at hand - now it's time for a real man's work. More precisely, we go directly to the technical part.


Lacquer needs to be coated with 7 layers, pre-treat each layer with sandpaper to form a more reliable coating.
Implementing such a project is not easy. Moreover, this is hard, painstaking work, in the process, which requires patience, dedication and diligence from the master. But such an element of the interior will attract much more attention than a boring piece of furniture bought in a store.

Your work will be rewarded.
Do-it-yourself furniture is pride for the owner
You have created a beautiful piece of wood. But the main question is, where to put it? You can put it in the living room or dining room and just cover it with a tablecloth. But is it really necessary to hide such beauty, because it is in the countertop that the highlight is.

The unique structure of the tree will fill any room with natural beauty.
Interior styles in which the table will look appropriate.

The ideal solution would be a rustic or Scandinavian style, but you can show a little imagination and taste. Be the designers of your home. Let the style of your home be individual.

Guests will pay attention to a bright element of the interior, and when they find out that it is handmade, there will be no limit to delight.
VIDEO: Coffee table from an old maple trunk.
50 photo ideas of original tables made from wood cuts:


Today, in the age of all-consuming urbanization, various interior styles are becoming increasingly popular, symbolizing unity with nature, such as country, Provence, peasant style and others. We lack simple natural things, we are drawn to nature in search of peace and tranquility. We invite you to create a stump table with your own hands, which will ideally fit into the interior of your city apartment or country house, provided that you prefer these particular areas or their adequate eclecticism. He will decorate the home and give it a lively personality, and at the same time will not make a hole in the family budget.
A table made from a cut of wood does not have to be "clumsy work"
In order to create a table from wood cuts with your own hands, you need very little, the main thing is imagination and desire.
So, let's begin.
To implement the idea, you, quite naturally, will need a suitable stump. This goodness is enough for the happy owners of a summer cottage with a stove-heated house. If you are not one of them, do not despair, there will surely be such friends. Otherwise, you can just visit the nearest forest. But no, do not cut living trees! Find a fallen tree and cut it into pieces. If you are lucky, you will get not only a table, but also a chair from a stump, or even a whole set.

If a tree has been uprooted, that same root can also be put to good use.

Quite picturesque interior specimens are obtained from the root.
Important! The tree must not be rotting. If the wood is damp, it will need to be dried. To do this, leave the prepared cuts in a dry, warm place for another month. The bark should peel off the tree easily.
In addition to the most important material, you will also need:
- chisel or chisel and hammer (in order to carefully remove the bark from the trunk);
- building level (the tabletop of your table should be perfectly flat, right?);
- planer for leveling the surface (if necessary);
- sandpaper of various grain sizes for grinding wooden surfaces;
- antiseptics for the treatment of wooden surfaces;
- various finishing coatings (stain, paint, varnish, etc.) depending on your wishes and preferences;
- various accessories that can be purchased at furniture stores (legs, wheels, handles, etc.).
Operating procedure
- After the suitable material is selected and prepared (cleaned of dirt and dried), tools and other necessary attributes are prepared, you can get to work. Carefully remove the bark from the tree using a chisel and hammer.

- Evaluate the evenness of the surface with a level and level it with a planer if necessary.
- Then, using sandpaper as intended, carefully sand the workpiece from all sides. You can speed up the process by using a grinder.

- It remains to cover your table with a special antiseptic and selected paints and varnishes, as well as mount accessories, for this you will need screws, a screwdriver or a screwdriver.

By the way, the tabletop of such a table can be made of another material. For a picturesque tree, for example, durable transparent glass is perfect.
If you are interested in the process of making furniture from hemp, and there is a great desire to try it, then for inspiration you can use the following ideas for creating interior masterpieces from the end cuts of wood.

As you can see, not only heating material can be made from hemp, but with a little effort and imagination, you can transform your home, creating a really worthy option in today's eco-style.
Furniture from tree branches
Having applied hemp, sections of the trunk and roots of a tree, one should not neglect the remaining parts, namely its branches. Consider the options and their applications.
Branches can also make a good table.

However, the process of its manufacture will take much more time and effort. It will take remarkable skill or the help of someone close to you. Glue for wooden surfaces, as well as small screws, will help to connect the parts together.
Interior items from branches
Before starting work, select the appropriate material. The main condition is the absence of rot and mold on the branches. In turn, cracks will add decorativeness to the branches.
- Clean the natural material of excess dust and dirt, and then dry thoroughly. It is best to dry the tree in the shade in a well-ventilated area, or even under a canopy, if possible.
- Next, you need to process the branches with kartsovka. Process in the direction of the fibers, first with a coarse and then a fine nozzle. Don't forget the end cuts.
- As already noted, you can connect the parts to each other using glue, screws, wedges, etc.
- After the blanks for the final product are ready and sized for joining, they must be processed. Large cracks, which are very embarrassing, can be eliminated with the help of epoxy resin in several stages. After the resin dries, sand down everything that has come out.
- The next step is product assembly.
- The finished piece of furniture must be decorated. To do this, you can use a stain, with which the color of the tree can be changed dramatically, while not losing all the charm of the texture of the material.
- In the final, it is desirable to use a varnish applied in at least two layers.
Your raging imagination, as well as our photos, will help to adapt the branches!
Dare, and do not stop in front of difficulties!


